|
This document explains
What Is DNS?
DNS can be considered something similar to a phone book.
When you move from one location to another, your name stays
the same, but your phone number may change. In order to point
your name to the new phone number, you must contact the telephone
service provider so they assign you the new phone number and
update all directory information to reflect you as pointing
to this new phone number.
In this way, the IP number can be compared to a phone number:
When someone calls http://www.example.com/, your ISP looks
at the DNS server, and asks "how do I contact example.com?"
The DNS server responds: "It can be found at 198.105.232.4".
As the Internet understands it, this can be considered the
phone number for the server, which houses the http://www.example.com
web site.
The DNS records for your domain are kept on your hosting
server in the place called DNS zone. When you register a domain
by means of the control panel, all DNS records are automatically
created for you, but in some rare cases you may need to add
custom records to your DNS zone. An example would be when
you want all email to be processed by an external mail server
rather than by the built-in mail system. However, such user
intervention requires knowledge of DNS configuration and clear
understanding of what is to be done.
How Remove/Restore Built-in DNS Records?
Starting with H-Sphere 2.4.3 Patch 2, you can remove/restore built-in (default)
DNS records of all types (A, CNAME, MX and TXT) via your cp:
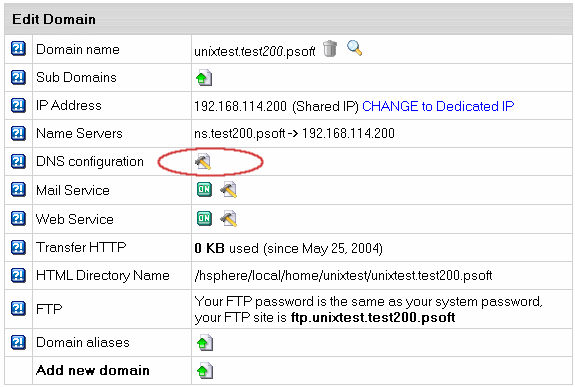
- Select Domain info in the Domain Settings menu.
- On the page that appears, click the Edit icon
in the DNS Configuration field:

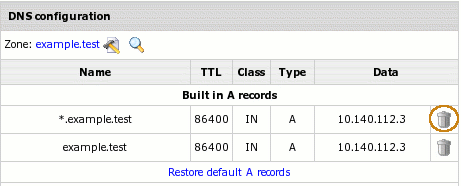
- On the DNS configuration page click the Trash icon
against the record you want to remove:

- To restore the record, click Restore default records.
How Do I Create Custom DNS Records?
To create a custom record to your DNS zone, do the following:
- Select Domain info in the Domain Settings menu.
- On the page that appears, click the Edit icon
in the DNS Configuration field.
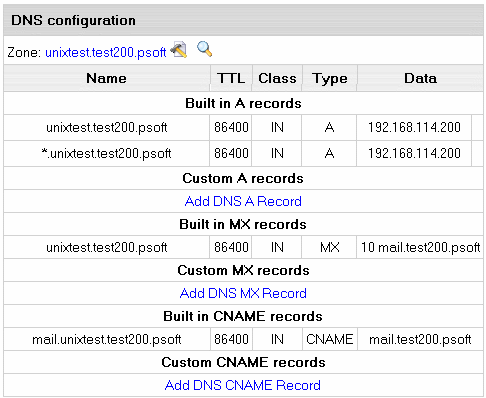
- This link will take you to the DNS Configuration page:

On this page you can see several blocks of DNS records. Some
are built-in and non-removable (for versions before 2.4.3 Patch 2); others
are user-defined and can be deleted. Built-in MX records require special
consideration: they can be removed by disabling mailservices for this domain.,
but all e-mail resources, including mailboxes, forwarders,
and autoresponders will also be deleted. The removal of H-Sphere
2.x email services was made possible to enable the use of
e-mail services provided by other mail servers.
You can add any type of DNS records by clicking an appropriate
link. You will be asked to enter corresponding DNS data.
Adding Custom A Records
Normally, A records are used to map domain names and web
server IP's.
If you have selected A record, the following page appears:

- Name: enter the string to map to the web server.
- TTL: set how many seconds will elapse before the
record is refreshed in the DNS cache.
- Data: enter the IP of the web server.
WARNING: Please pay attention to $ORIGIN when you add an
A record.
Adding Custom MX Records
Custom MX records should be added when you want to use
your external mail servers to process your e-mail. To use
your external servers instead of those you get by default,
you need to disable mail service on the Domain Settings
page of your control panel. To use the external mail servers
in addition to those you get by default, you need to
keep mail service enabled in the control panel. The priority
of the custom MX record will define whether your external
servers will act as secondary or primary. For instance,
if you set the priority of the custom MX record higher than 10
(e.g. 11), your external mail server will be used as secondary.
If you set the priority of the custom MX record lower than 10
(e.g. 9), your external mail server will be used as primary.
In the latter case, your mail will be sent to your external
mail server until it goes down or becomes otherwise inaccessible.
Then the default mail server will take over.
When you enable mail service in the control panel, an MX
record is created automatically in the DNS zone. If mail
service is disabled, this built-in MX record remains in the
DNS zone, and you can remove it manually using the control
panel interface.
If you have selected MX record, the following page appears:

- Name: your local domain name. If you
leave the Name field blank, all mail will be
redirected for the base zone.
- Data: the priority of the record and mail domain
name (not the IP) mail will be forwarded to.
IMPORTANT: To add an MX record for the base domain, leave
the Name field empty.
Adding Custom CNAME Records
Finally, CNAME records are used to map aliases with domain names.
If you have selected CNAME record, the following page appears:

- Name: The alias you give to the real host name.
- TTL: set how many seconds will elapse before the
record is refreshed in the DNS cache.
- Data: The real name of the host you create an alias to. This must be
an official host name. It cannot be an alias. A CNAME-record
should always point to an A-record to avoid circular references.
WARNING: Please pay attention to $ORIGIN when you
add a CNAME record.
|