|
Mailboxes allow you to send, receive and store e-mail
messages. Here you can learn how to:
Creating a Mailbox
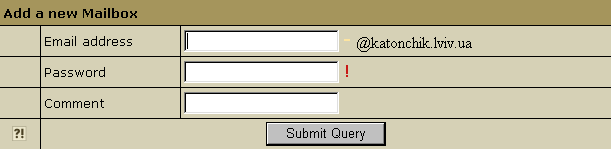
To add a new mailbox, do the following:
- Select Mail Info in the Mail Info menu.
- At the bottom of the page that appears, click Add new mail resource:
- Choose Mailbox from the drop-down list and click Next
:

- Agree with the charges, if any.
- Enter the name and password for the new mailbox and click Submit:
Combining forwards and autoresponders
In version 2.3 and higher, if you want your mailbox to work as
forward and mail autoresponder at the same time, you can give forward, mailbox
and autoresponder the same name within one mail domain. In this case, your mailbox
will forward all incoming email to another address and send responses to senders.
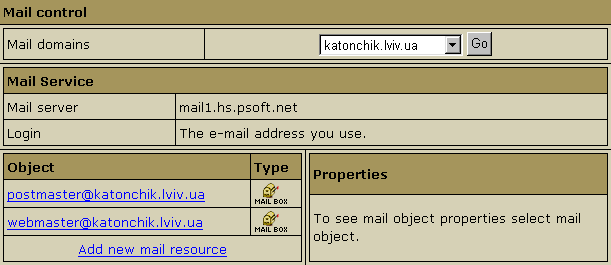
Postmaster account
You get Postmaster mailbox for free and you can neither
delete it nor change its quota. Webmaster is a regular mailbox and it
counts towards your total maiboxes. This means, if you get 0 free mailboxes,
you pay for the Webmaster box, but you don't pay for Postmaster.
Configuring a Mailbox
To configure a mailbox, click the Edit icon next to the
name of the mailbox. You will see the list of its properties
on the right:
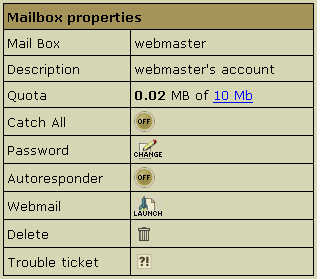
- Quota: change the quota for this specific mailbox.
Mailbox quota is not related to the site disk space quota.
To change your mail quota, enter its new size in megabytes.
From that moment on you will be charged for the difference
between this new amount and the default free amount. This
charge will be added to the recurrent fee
at the beginning of each billing period.
- Catch All: if it's on, any email messages sent to a
nonexistent account on your domain will go to this address.
Example: your mailbox [email protected]
is marked as catch all. If someone sends an email
to [email protected], which doesn't exist, this particular
message will arrive at [email protected]. If no account
were marked as catch all, this message would bounce
back to the sender with an error notification.
- Password: click the icon
to change the mailbox password.
- Autoresponder: set your mailbox to respond to the sender of incoming
mail with a preset message. You need to compose a separate response message
for every mailbox. Note: in version 2.3 and higher, autoresponder is
an independent mail resource.
(For details see Creating Autoresponder)
- WebMail: go to the web e-mail client to send or
receive e-mail messages.
- Discard all incoming mail: turn this ON only if
you are absolutely sure you don't need ALL your incoming mail.
You can also turn it on when you are going on vacation.
Senders won't receive 'undelivered mail' notices.
- Delete: delete the mailbox. To delete a Catch All
mailbox, first switch Catch All OFF.
- Trouble Ticket: report troubles with the mailbox.
|