|
SSL (Secure Sockets Layer protocol) is a standard for transmitting
confidential data such as credit card numbers over the Internet.
Most true business sites support this feature which allows
more security in data transmitted over the web.
SSL uses a private key to encrypt data that is transferred over the SSL connection.
SSL requires a dedicated IP, because name-based hosting does
not support data encryption in HTTP requests.
In H-Sphere you can use certificate you already have or
create a temporary certificate and then
acquire a permanent certificate from a trusted authority.
If your provider offers a Shared SSL certificate,
you can use it instead of purchasing a certificate of your own.
If your hosting provider allows it in your plan, you can buy and install a permanent
Comodo Certificate
directly from your CP (more).
Later you can renew permanent certificates.
Also check errors and solutions.
Use the Key and Certificate You Already Have
To enable SSL, do the following:
- Select Domain info in the Domain Settings menu.
- Click the Edit icon in the Web Service field.
- Enable SSL for the domain in the list.
- One the page that appears, choose the
Import SSL certificate option in the SSL Support section.
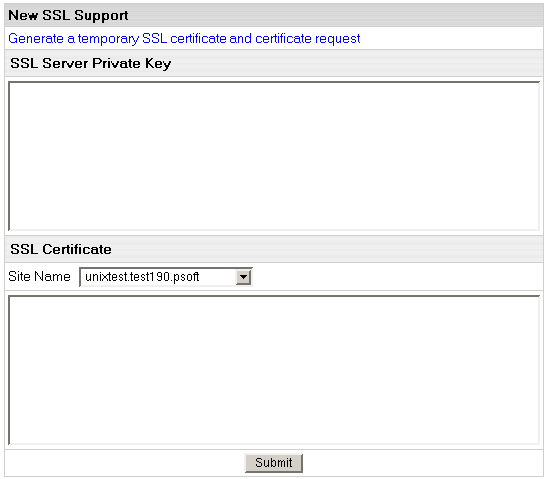
- Enter the SSL Server Private Key and SSL Certificate in the boxes that appear:

- In the Site Name field, choose whether you want to secure with or without the www prefix.
Only one option will work correctly. For instance, if you choose to secure
http://www.domain.com, your visitors will get security warnings when they go to http://domain.com.
- Click Submit. Now your site is secured.
Create a Temporary Certificate
The only difference between temporary and permanent certificates
is that temporary certificates are generated by your control
panel, not trusted Certificate Authorities. Thus, when visitors
enter your site, they will get the "unknown certification
authority" warning window.
To generate a new temporary SSL private key and certificate, do the following:
- Select Domain info in the Domain Settings menu.
- Click the Edit icon in the Web Service field.
- Enable SSL for the domain in the list.
- In the SSL Support section click Import SSL certificate.
- On the page that shows click Generate a temporary SSL certificate and certificate request.

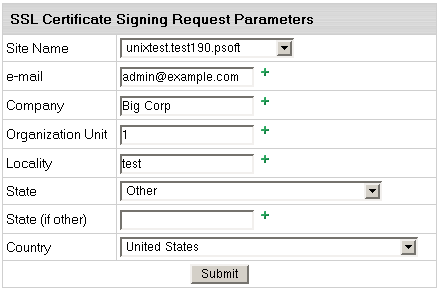
- On the page that appears, apply your details by clicking Submit:

These data will be used to generate the certificate. Don't make changes
to the data if you are not sure about the purpose of these changes.
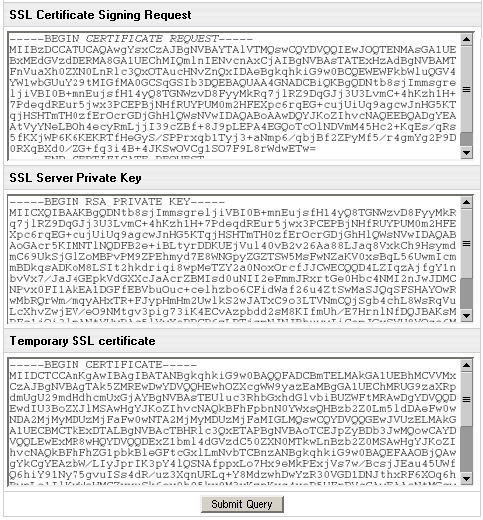
- Follow instructions that appear at the top of the next page.

- SSL Certificate Signing request includes the details
that you submitted on the previous step. Use this request
if you want to get a permanent SSL certificate from a trusted Certificate Authority, such as
Comodo CA, Thawte or VeriSign
(see below).
- SSL Server Private Key is the secret key to
decrypt messages from your visitors. It must be stored
in a secure place where it is inaccessible to others.
Don't lose this key, you will need it if you get a permanent certificate.
- Temporary SSL Certificate validates your identity
and confirms the public key to assure the visitors that
they are communicating with your server, not any other party.
- Click Submit Query.
Acquire a Permanent Certificate
To get a permanent certificate, do the following:
- Generate a temporary SSL certificate (see above).
- Copy the certificate signing request (CSR) and private key for later use.
- Go to Comodo CA,
or any other Certificate Authority and choose to get a new certificate.
When requested, enter the signing request that you have saved.
Important: When obtaining SSL certificate,
make sure it is generated for Apache regardless of whether you intend
to install it on windows or Unix box.
- After the permanent SSL Certificate has been generated,
save it to a secure location.
- Select Domain info in the Domain Settings menu.
- Go to the Web Service page and click the Edit icon in the SSL field.
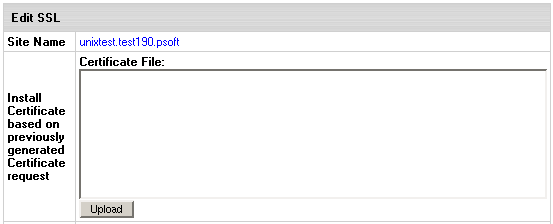
- Enter the certificate into the upper box of the form that opens
("Install Certificate based on previously generated Certificate request"):

- Enter your certificate:

Certificate Authority File (for Comodo -
intermediate CA certificate).

Certificate Chain File
(for Unix accounts only, Windows doesn't support Chain Certificates).
- Click Install.
- Now you can use the certificate jointly with the private key you have saved.
Use Your Provider's SSL Certificate (Shared SSL)
If your provider offers a Shared SSL certificate, you can
use it instead of purchasing a certificate of your own. Unlike
a regular SSL certificate, it costs less, doesn't require
a dedicated IP, and belongs to an equally trusted Certificate
Authority. The disadvantage of shared SSL is that it can be
used only with third level domains.
Shared SSL requires that your site runs on a shared IP.
To secure your site with Shared SSL, do the following:
- Select Domain info in the Domain Settings menu.
- Click the Edit icon in the Web Service field.
- Enable Shared SSL for the domain in the list.
- Agree to charges, if any.
- If you are using a second level domain (example.com),
you will be asked to create a third level domain alias (e.g. domainalias.example.com):

Now the site is available both at the non-secured second
level domain name (e.g. http://example.com) and at
the secured third level domain alias (e.g. https://example.victor.psoft).
Note that Shared SSL certificates work only within one domain
level, i.e. for user1.example.com and not for
www.user1.example.com. In the example above, the certificate
will not work for www.example.victor.psoft,
and your visitors will get the warning: "The name on
the security certificate does not match the name of the site".
NOTE: When designing your pages set any internal links
to images or frames as <a href='https://user.domain.com/images/example.jpg'>
or simply <a href='/images/example.jpg'>.
If you use the <a href='http://...> link, your visitors
will get the message: "The page contains both secure
and non-secure items". This isn't much of a problem in
terms of security, since visitors may simply choose the "do
not display non-secure items" option, but no graphics will be displayed.
Renew Permanent Certificates
If your certificate is about to expire, do the following:
- Find the certificate signing request (CSR) that you saved
when acquiring the old certificate.
- Go to your certificate authority and choose to renew the certificate.
When requested, enter the CSR.
- After the permanent SSL Certificate has been generated,
save it to a secure location.
- Select Domain info in the Domain Settings menu.
- Go to the Web Service page and click the Edit icon next to the SSL Support.
- Enter the corresponding certificate into the box of the form that opens:

- Click Upload.
- Now you can use the certificate jointly with the private key you have saved.
Check Errors and Solutions
- Different key and certificate.
Your private key on the server doesn't match the certificate.
This is probably because private key or CSR (certificate submission request) was
re-generated after you ordered certificate.
Take CSR and get replacement certificate (InstantSSL has free re-issuance).
|