|
AntiVirus resource checks incoming mail for viruses and if detects any, sends e-mail notification about it and deletes the virus mail.
You can enable antivirus resource for all mail domains in your account, for specific maildoman and for mail resources of specific maildomain.
You can manage antivirus protection
- on the account level
- on the mail domain level
- on the mail resource level
To manage antivirus for the entire account:
- Select Account settings in the Account menu. The following page will show:

- Click to add antivirus resource for all mailboxes or for all mail resources (box, forward, alias, responder) in this account.
- You can delete all antiviruses in this account by clicking the Trash icon.
To manage antivirus at the level of mail domains:
- Go to the Mail Info menu and select a mail domain from the drop-down box.
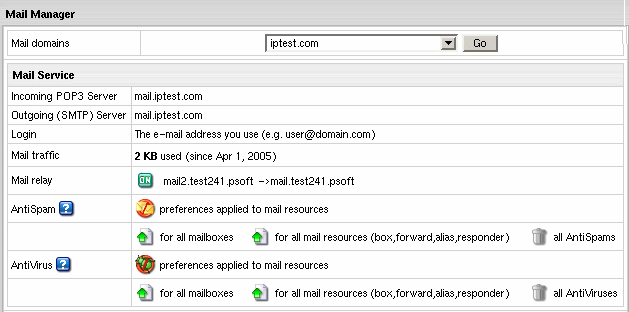
- Click Go and you will see the mail service details of the chosen mail domain:

- On the page you will be taken to, add antivirus resource either for all mailboxes of this mail domain
or for all mail resources (box,forward,alias,responder).
If necessary, you can delete all antiviruses under this maildomain by clicking the Trash icon.
- Clicking the antivirus icon will let you configure antivirus settings for mail resources.
- Click the Submit button at the bottom of the form.
To configure antivirus protection for a mail resource:
- Click the e-mail address in the E-mail list on the Mail Manager page. The following page will appear:

- Check the AntiVirus box.
- Click the Submit button at the bottom of the form.
- On the Mail Manager page click the Antispam icon in the Resources included column:

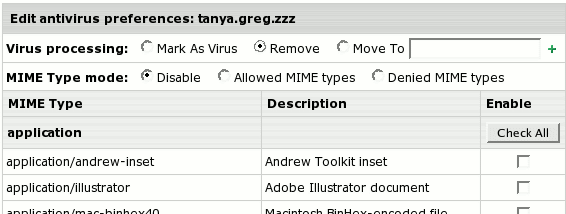
- On the page that appears, edit the Antivirus Preferences if necessary:

Virus processing:
By default, it is set to Remove all incoming mail that bears a virus.
- Mark as virus: this will tag the email as virus, i.e. add the word virus to the
subject line of the email and then forward the email on to the client as an
attachment with details.
- Remove: this will delete the email so when the client performs
a send/recieve, they will never see the email.
- Move To: this allows you to specify a mailbox infected email goes to.
The client will never see this email unless they access the specified mailbox.
MIME Type mode:
( in 2.5.1) in 2.5.1)
This will tag an email as virus according to the attachment's MIME Type.
By default, it is Disabled.
- Disabled: this will make MIME Type mode unavailable.
- Allowed MIME Types: this lets you check the MIME Types to be allowed, so the client will receive the emails
only of these MIME Types. The other emails will be rejected.
- Denied MIME Types: this lets you mark the MIME Types to be denied, so the emails with attachments of these MIME Types will be rejected and returned to a sender.
The MIME Types are grouped into sections, so you can use the Check all options to mark all the section.
- Click Submit.
In HS 3.0 RC4 and later, once default Antivirus preferences were changed and customized, it shows as a custom icon next to the mailbox:

It helps you track changes in your mail resources.
|