|
This document considers the following aspects of file transfer process in H-Sphere:
Main FTP User
After signup users are provided with FTP access to their home directory.
To establish an FTP connection, you will need the following pieces of information:
FTP login, FTP password, and FTP host name.
To find this information:
- Select FTP User link in FTP/User Account menu.
- On the page that appears:
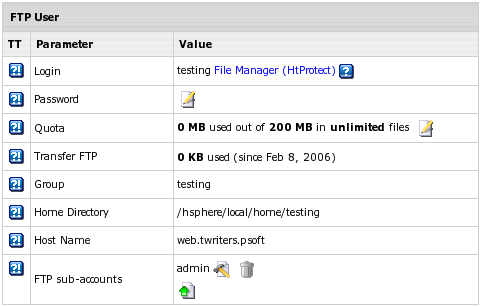
- Login - is the login to be used to enter a user directory via FTP.
It is automatically generated on the basis of the account name.
Note: instead of using an FTP client, you may choose here H-Sphere built-in Web-based file manager
WebShell by clicking the File Manager (HtProtect) link.
- Password - by default is the password associated with your username. If necessary, you can
change and hence make it different from you CP password.
- Host Name - is a web server domain name to be used to access files via FTP.
Sharing FTP access to your home directory
There are different ways to allow guest users to download, upload or view files in dedicated
directories of your account:
FTP Subaccounts(starting with 2.5 version
available for Unix and Windows based accounts;
for versions lower than 2.5 - for Unix based accounts only)
The simplest way to authorize your friends or colleagues to work with
particular directories of your account is to create FTP subaccounts.
An FTP subaccount is a combination of a username and a password,
which gives full FTP permissions to a single directory, without giving
access to the root directory, other directories or the control panel. No
dedicated IP is required for FTP subaccounts. Although each FTP
subaccount has a login which is different from yours, both have the same ID in the system.
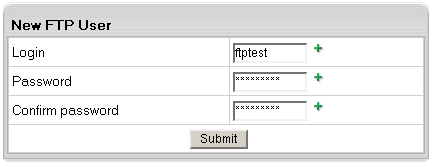
To create a new FTP subaccount:
- Select FTP User link in FTP/User Account menu.
- At the bottom of the page that shows, find FTP sub-accounts (or System accounts in H-Sphere 2.5.1 and up) and
click the Add icon.
- On the next page, enter the FTP login and password that will be used
by this other user, and the directory this user will be restricted to.
The directory must be relative to your home directory. If you leave
the directory field empty, FTP sub-users will have access to
your whole home directory.
Notes:
- FTP subaccount's directory can be multi-level nested subdirectory relative to your home directory.
- For Windows accounts you must use the "\" character as a delimiter in the path.
- Before H-Sphere 2.5, leading slash is required (e.g., /domain.com/dir/subdir).
In H-Sphere 2.5 and up, you must not add the leading slash (domain.com/dir/subdir - Unix,
domain.com\dir\subdir - Windows).
- In H-Sphere 2.5.1, when creating FTP subaccounts you can also make the FTP subuser being set up a SharePoint user. For this,
on the first step check Allow sharepoint access as well and enter SharePoint
settings.
FTP subaccount traffic is a part of the Total/Summary
traffic, but you can always see how much FTP traffic has been run up by
an individual FTP subaccount by going to the FTP Manager page
and clicking the Edit icon next to the subaccount login.
Important:
Windows FTP-subaccounts work only if Webshell version is 4.3.2 and up.
Virtual FTP
(available only for Unix based accounts)
Virtual FTP provides ampler possibilities than FTP sub-accounts.
You can give your authorized Virtual FTP users access to more than
one directory and specify a different set of permissions
for each directory. Virtual FTP users log right into your
root, but can enter only those directories you allow them
to enter.
To provide Virtual FTP Access to a certain domain, do the following:
- If you are using a dedicated IP, skip this step. Otherwise,
switch to dedicated IP.
- Select FTP in FTP/User Account menu.
- Enable FTP for this domain:
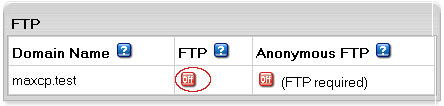
If you have several domains, choose the one to enable virtual FTP for.
- Click the confirmation link to agree with the charges.
- Fill the form that appears:
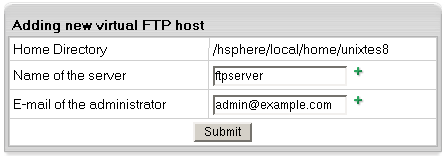
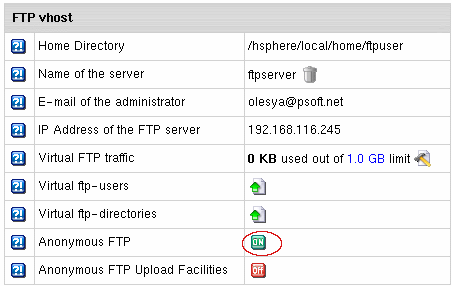
- Add Name of the Server for the new virtual host. This name will appear
in the welcome message when guest users connect to your server with FTP clients.
- Enter E-mail of the administrator by which FTP users can reach you with questions or comments.
- Create a new Virtual FTP User by going to the FTP Host page and clicking Add for Virtual ftp-users
- Click the Add icon for Virtual FTP Directories
and enter the name for the new Virtual FTP Directory:
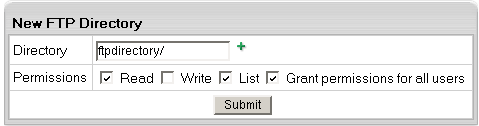
- End it with a slash, e.g.: Dir1/.
- The location must be specified relative to root.
To create a virtual FTP directory inside a different
directory, include the path, for example UserDirs/Dir1/.
On the same page, specify permissions to this directory:
Read: check to allow file downloads from this directory.
Write: check to allow file uploads to this directory.
List: check to allow viewing / browsing the contents
of the directory. It is usually used jointly with Read.
Grant Permissions to all users: check to grant these
permissions to all your Virtual FTP users.
If you leave this property unchecked, you will have to
define permissions on this directory individually for
each Virtual FTP User.
- Click the Edit icon next to the directory you have
just created. If you haven't granted the same permissions
to all your Virtual FTP Users, you can specify permissions
for each of them individually:
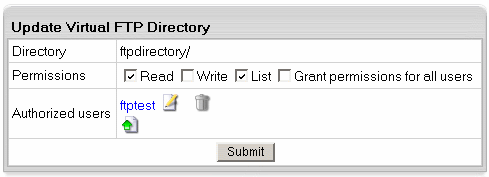
If you have chosen to grant the same permissions to all
users, you can skip this step.
Anonymous FTP
This feature allows you to give public FTP access to a dedicated
directory in your account. A special directory is created in
your root, and its content can be viewed and downloaded, but not
uploaded.
Anonymous FTP becomes available only after you create a Virtual
FTP server. To configure Anonymous FTP, do the following:
-
Select FTP in FTP/User Account menu.
- If you have several domains, choose the one to enable virtual FTP for.
On the page that appears, switch to dedicated IP.
(Read more about Shared and Dedicated IPs.)
- Skip this step if you have already enabled Virtual FTP.
Select FTP in FTP/User Account menu. Enable FTP for this domain:
and agree with the charges.
- On your control panel home page,
select FTP in FTP/User Account menu. Enable Anonymous FTP for this domain:
- Agree with the charges if any.
Anonymous FTP Upload Facilities
If you want to allow anonymous FTP users to upload files,
enable Anonymous FTP Upload Facilities by doing the following:
- Enable Anonymous FTP.
- At the bottom of the FTP vhost page you will find a new option to
enable anonymous FTP upload facilities:

Turn it on. This will create a dedicated directory inside the Anonymous FTP
directory.
* The Uploads (Windows based plans) / Incoming (Unix based plans) directory
have only 'upload' permissions, so it will allow neither downloading nor viewing
its content.
|