Knowledge Base

- Login to your OpsPi Account.
- Go to "Hosting Controls" > "Domains"
- Select and click on your domain.
- Go under "My Website" panel and choose "Start Website Builder"
- You will get a list of templates. Choose the required template.
-
- Drag & drop layout from main toolbar;
- Choose layout composition;
- Select one of the following layout in right toolbar:
- Horizontal Layout:
- Element alignment is horizontal.
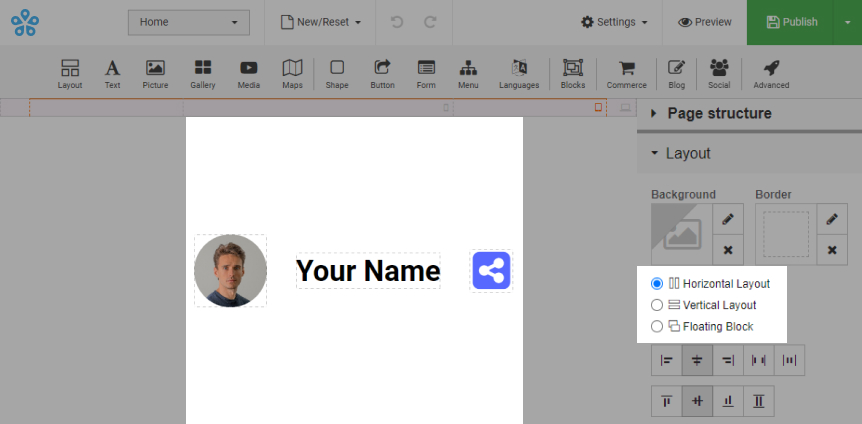
- Element alignment is horizontal.
- Vertical Layout:
- Element alignment is vertical.
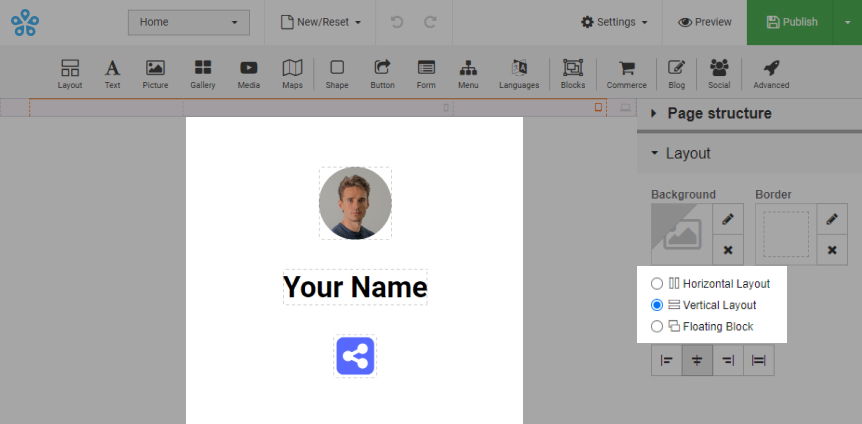
- Element alignment is vertical.
- Floating Block:
- Element alignment does not have a strict structure.
Note. No additional layouts should be added to floating block.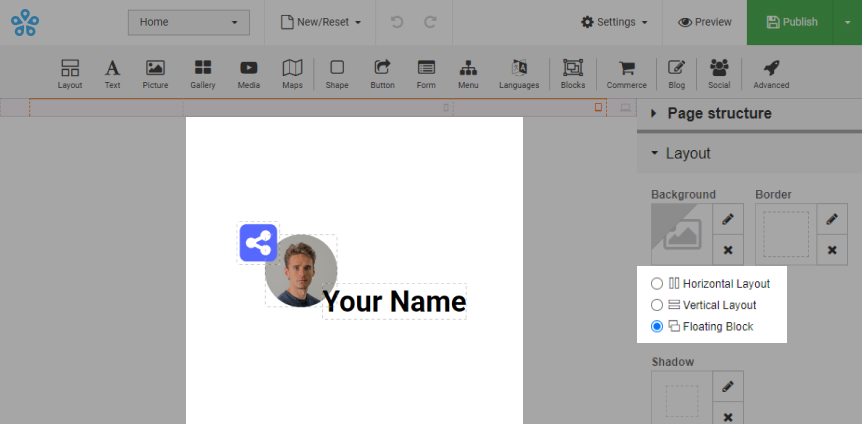
- Element alignment does not have a strict structure.
Background can have an image/video uploaded:
-
Option 1:
- Upload it as background gallery.
-
Option 2:
- Select layout and select background ;
- Select image/video and upload video;
- Adjust opacity;
- Select position, choose what position picture will start from;
- Select repeat options. Horizontally or vertically to have image/video repeat for horizontal/vertical position;
- Select "Don't scroll background" to have background at the same position;
- Select "Offset" to move image/video from the starting point;
- Select "Auto" to have auto resize picture and select if the picture is going to be stretched to fit the layout or it is going to fit as it is.
- Preview:
-

-
Login to your OpsPi Account.
-
Go to "Hosting Controls" > "Domains"
-
Select and click on your domain.
-
Go under "My Website" panel and choose "Start Website Builder"
-
Click "New/Reset" dropdown list at top of builder;
-
Select "Change template" and choose from templates available or create website from "Blank Template"
Note: All components disappeare when template is changed.
- Save backup:
- Open your websites;
- Open the builder with the original domain using "Edit Website" button;
- Save website's backup by following step 1 in the link.
- Restore backup:
- Open the builder with the new domain using "Edit Website" button;
- Restore backup by following step 3 in the link.
- If you don't have a website yet:
- You can use the "Landing page" template;
- You can use the "Landing page" template;
- Сonnect the menu items with the necessary sections of your website by going through the steps (in step 4, use the part for "menu item").
- Adding layout:
- Drag and drop layout from main toolbar;
- Choose layout composition;
- Add elements into your layout;
- If you have more than one layout you can add elements to each layout.
- Customising layout
- Position:
Change elements position in layout. Choose from "Horizontal Layout", "Vertical Layout" or "Floating Block" in right toolbar. - Alignment:
Align elements in layout by selecting alignment for that layout in right toolbar. - Background:
Select layout and click background icon in right toolbar; Choose your background layout colour and opacity; Or upload image/video:- Adjust opacity;
- Select position, choose what position picture will start from;
- Select repeat options. Horizontally or vertically to have image/video repeat for horizontal/vertical position;
- Select "Don't scroll background" to have background at the same position;
- Select "Offset" to add move image/video from the starting point;
- Select "Auto" to have auto resized picture and select if the picture will be streched to fit to layout or fit as it is;
- Sele
- Dublicate:
Add duplicate layouts by clicking on icon on layout you want dublicate and choose "Dublicate". - Borders:
Select layout and click border icon in right toolbar to add borders to layout and choose your width, style and colour. - Size:
Adjust layout size or "Allow to adjust size automatically" in right toolbar.
- Position:
- Adding Menu:
- Drag and drop Menu from main toolbar;
- Choose Menu composition;
- Click "New Menu Item":
- Select type of menu item (e.g. "Page");
- Enter "Name";
- Select from dropdown list "Copy layout from" (e.g. Home);
- (Optional) Select section that needs to be clear; Click "Apply".
- Customising Menu:
- Select type of menu item:
- Page on your website.
Select page from dropdown list. - Web Address.
Enter URL. - File from your Website.
Click and select file from gallery or "Upload New File". - E-mail address.
Enter e-mail address. - Phone Number.
Enter phone number together with country code. - Popup.
Select popup page from dropdown list or click to create "New Popup". - Empty.
Leave the menu item empty.
- Page on your website.
- Select additional options to "Open in a New Window", etc.
- Submenu:
- Drag your created element to required location or on top of a menu element to create a submenu.
- Note: By default if menu is placed in "Header" or "Footer" section of the website it will be shown on all pages.
- If menu is in "Body" section of the website, select "Visibility" and select how to show your menu.
- Select type of menu item:
- Adding new page:
- Select "Settings" at top of website builder and select "Pages";
- Select "New Page";
- Select page type;
- Write page "Name";
- Select from dropdown menu which page layout to copy;
- (Optional) Select section that needs to be clear;
- Click "Apply".
- Customising new page:
- Make page as home page, do not index or show popup when page is open;
- Add SEO to your page: Title, description, etc.;
- Add page background;
- Add custom script.
- Click "Page Structure" at the top of right toolbar;
- Select element and drag and drop it to where you want to move it (e.g. select layout and drag and drop it in footer).
To add files to your website, you can upload it gallery.
Types of files that can be added to your website:
- Image:
'jpg', 'jpeg', 'gif', 'png', 'svg', 'webp' - Video:
'ogg', 'mp4', 'mpeg', 'avi', 'flv', 'mkv', 'mov', 'webm' - Favicon:
'jpg', 'jpeg', 'gif', 'png', 'ico', 'svg' - Audio:
'mp3', 'aac', 'wav', 'ra', 'midi', 'ram', 'wma', 'ogg', 'ape' - Other documents:
'pdf', 'docx', 'doc', 'xls', 'xlsx', 'rtf', 'ppt', 'pptx', 'odt', 'txt', 'csv', 'html', 'xml', 'js', 'yml', 'rar', 'zip', 'tar', 'gz', 'eps', 'cdr'
- Select a Layout and type of layout in right toolbar;
- Select alignment of your elements in layout;
- Select alignment for vertical layout, if horizontal layout and "Switch to vertical layout on smaller screens" is selected.
- Save backup:
- Open the builder with the initial domain using the "Edit website" button;
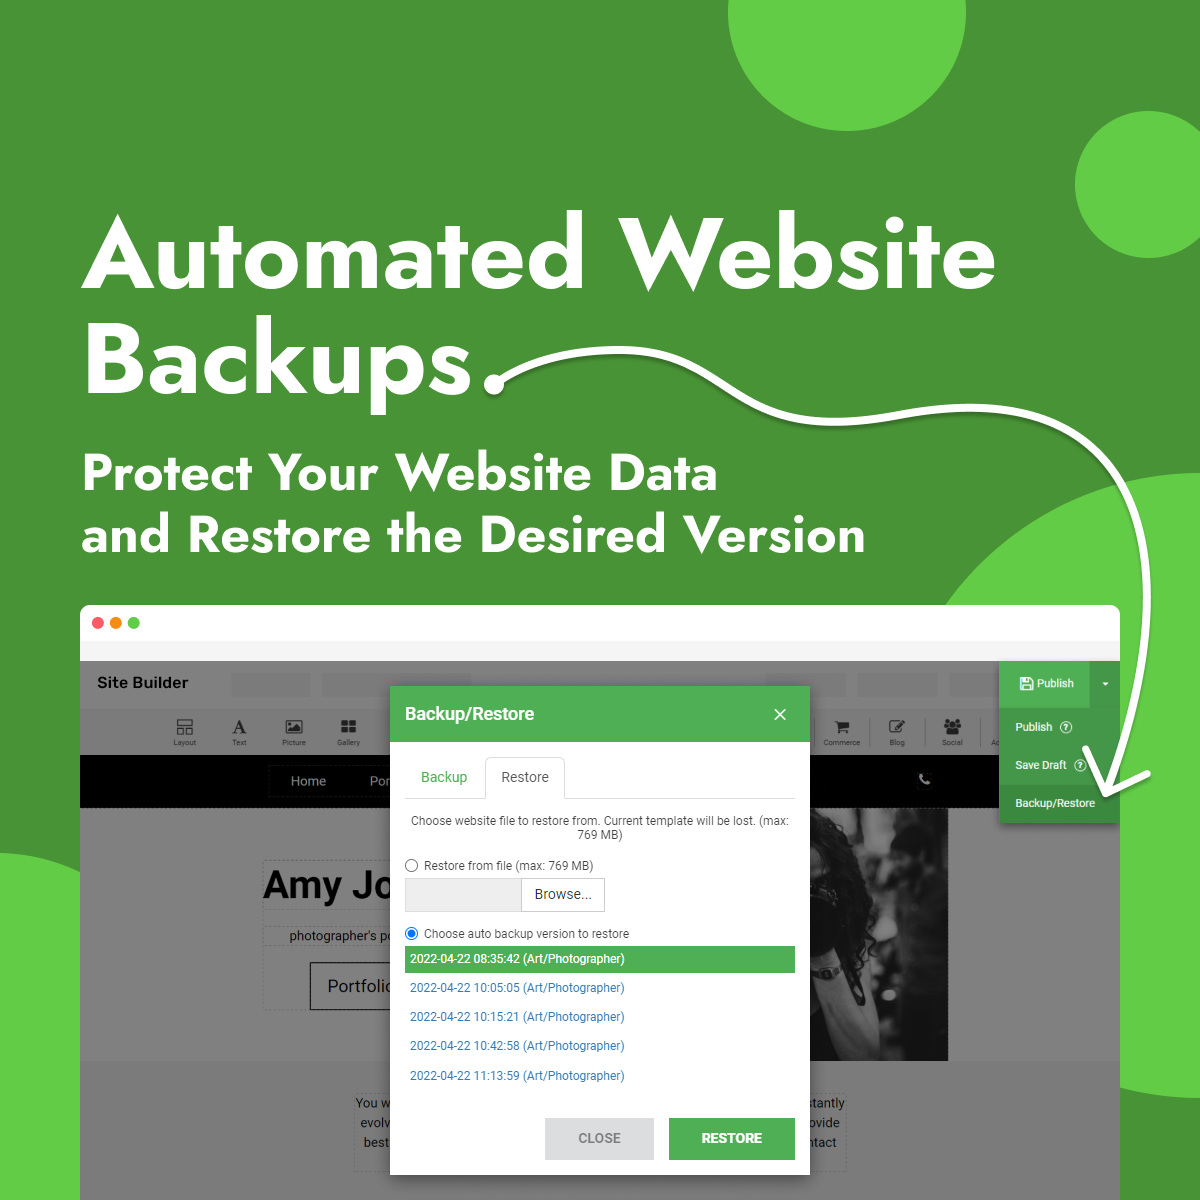
- Select the "Publish" drop-down list and select "Backup / Restore";
- Click "Download Backup" button.
- Auto backup:
- Go to "Publish" dropdown list and select "Backup / Restore" option;
- Switch to the "Restore" tab and choose auto backup version to restore;
- Auto backups are automatically saved every 5 minutes.
- The number of auto-backups per website is limited and it saves 50 copies by default. Only 50 newest copies are saved when the limit is reached.
- Restore backup:
- Go to "Publish" dropdown list and select "Backup / Restore" option;
- Select "Restore" tab;
- Click "Browse" and choose downloaded backup from your computer or choose auto backup version to restore;
- Click "Restore".
- Select element / layout you would like to copy;
- Click in top right corner of the element;
- Select copy and select layout in which you would to paste copied element/layout;
- Click in top right corner of the layout and select paste;
- Click "Undo" button at the top of the builder to go back to previous step;
- Click "Redo" button at the top of the builder to cancel undo action. This button only appears if you used "Undo".
- Select element / layout you would like to duplicate;
- Click in top right corner of the element;
- Select duplicated element and drag it to section in which you would like it to appear.
- How to add anchors?
- Choose "Advanced" category in right toolbar;
- Write "Anchor name" (e.g. anchor) (Optional) Write "Class name" and "Name";
- Select element you want to link to anchor:
- For menu item:
- Select "Edit Menu" in right toolbar;
- Click on "New Menu Item";
- Select "Link" and write "Name";
- For image/button:
- Click icon below "URL" in right toolbar;
- For text:
- Select text part you need to add anchor;
- Click "Link" button in text editor;
- For menu item:
- Select "Page on your website";
- Choose Anchor name from dropdown list;
- Click on "Apply".
You can add animations on all elements on your website:
- Click on element in builder that will have animations;
- Select "Animation" section in right toolbar;
- Select "Effect" type (e.g. Fade in, Bounce in, Zoom in) and edit its properties if needed:
- Direction;
- Duration;
- Delay;
- Loop.
- Set effect on "Default" or / and on "Hover".
Set text style for your website builder.
- Select "Settings" and "Styles" at top right of the website builder;
- Select text style and select font, size, etc.;
- Select "Links" and set link text colour and link hover;
- Select "Advanced" to adjust aditional features.
- Select "Settings" at the top of builder;
- Select "Favicon";
- Click favicon ;
- Click "Add New" / "Upload New Picture" or drag and drop the file to upload or change favicon;
- Click "Apply".
- Login to your account;
- Go to My Websites;
- Click "Edit Website" button next to domain you would like to publish;
- Make necessary changes to your website;
- Click "Publish" website at top of the builder to make your website visible to public;
- You can publish "Under construction" template of website while you create your website.
- Click "New / Reset" dropdown list at top of builder;
- Select "Reset" and start from beginning.
Note: All your current progress will be lost if you choose to reset template.
- Adding Cookie policy:
- Go to "Settings" at the top of the builder and select "Settings";
- Select "Cookie policy";
- Click on "Enable cookie policy block".
- Click on "Add new"; These cookies will be loaded only after visitor consents;
- Write "Cookie name" and "Cookie description";
- If necessary, check the box "Required functional cookie"; In this case, this cookie will be required.
- Customising Cookie policy:
- Write button text;
- Write customise button text;
- Select text font, size, background, message colour, button colour and button text colour;
- Write cookie policy message.
- Click "Apply".
- Click "Preview" at top of the website builder;
- You can see how your website will look online through different formats (e.g. desktop);
- Click "Close preview" at top right corner to close preview window.
Your websites are automatically created to look good on all devices.
To check your website responsiveness:
- Select different size screens just above your website content;
- Select preview.
Select different size screens to see how it looks.
Note: If you need to adjust some elements only on particular screen see the link.
Elements visibility can be managed for:
- Devices:
- Select an element / layout / page section;
- Select "Visibility" on right toolbar;
- Choose devices that you want to show/hide selected element/layout.
- Pages:
- Select element / layout / page section;
- Select "Visibility" on right toolbar;
- Choose to "Show on current page only", "Show all pages" or "Show specific pages".
Elements visibility can be managed for:
- Select a layout you want to adjust;
- Select layout colour by clicking Background in right toolbar;
- Select layout colour or image / video for the background;
- Select "Visibility" in the right toolbar;
- Select devices that you want your layout to appear in (e.g. a wide screen, desktop, and tablet);
- Select a different size of screen above your website content (e.g. phone);
- Insert another layout in the same position where the previous was;
- Select that layout and choose layout colour by clicking "Background" in right toolbar;
- Select different layout colour or image / video for the background;
- Select "Visibility" in right toolbar and set it to show for that layout only (e.g. phone).
- Select element that will be used to download a file (example: image, button, text);
- Select "Advanced" tab in the right toolbar;
- Find "URL" on tab;
- Click next to "No link selected" button;
- Select "File from your Website";
- Click button;
- Click "Upload New File";
- Choose necessary file from computer;
- Click "Select";
- Click "Apply".
- Press Ctrl / Cmd key on your keyboard and select elements you want to edit;
- Make changes to selected elements in right toolbar.
Note: If you choose same category elements you will have more features to edit.
Each template has its own default elements and each element is placed differently per template.
So, after changing template, your created website will be lost.
Website have not been created:
- Select the required "Under construction" template;
- Edit website;
- Click "Publish" at the top of website builder;
- Click "New / Reset" dropdown list at the top of website builder and select "Change template";
- Select new template;
- Select the checkbox "Got it" and click "Yes, change template";
- Edit your website, but don't publish it until it's finished.
Use "Preview" button to view your website.
Select "Publish" dropdown list at the top of website builder and select "Save Draft" to save your progress.
Hiding website while it is being created / updated:
- Save backup of your current website;
- Select "New / Reset" dropdown list at the top of website builder and select "Change template";
- Select "Under construction" template;
- Select the checkbox "Got it" and click "Yes, change template";
- Edit website;
- Selec "Publish" dropdown list at the top of website builder and select "Backup / Restore" option;
- Restore backup of website you want to continue editing;
- Edit your website, but don't publish it until it's finished.
Use "Preview" button to view your website.
Select "Publish" dropdown list at the top of website builder and select "Save Draft" to save your progress.
- Select an element you want to edit;
- Select "Visibility" in right toolbar;
- If an element is not visible but should be:
- Select devices that you want your element to appear in.
- If it is still not appearing in the preview:
- Find the element in Horizontal / Vertical (parental) layout and check for its "Visibility" option;
- Select layout's visibility for necesary devices so its inner element would be also visible in the preview.
- Different customer experience:
- 1-click-purchase ;
- Catalogue with Inquiry form ;
- Full E-commerce with Cart .
- Product Management:
- Products (images, SKU, price, etc.);
- Categories (for menu and filters);
- Item Types (e.g. phones, monitors, etc.);
- Product variations (e.g. colours);
- Different listing options;
- Different filters.
- Store Management:
- Order management;
- Currencies and formats;
- Automatic invoice system;
- Shipping and delivery options;
- Stock management (Qty);
- Customisable tax system (neto/bruto prices).
- 40+ payment gateways;
- Element alignment does not have a strict structure.
Note. No additional layouts should be added to floating block.
- Element alignment does not have a strict structure.
- E-commerce Templates:
- Ready Templates;
- Designing from scratch;
- Easy integration to any template.
- Aditional features:
- Terms and conditions;
- Multiple languages;
- SEO (including microdata).
You can create differrent type online stores.
To create full e-commerce with cart:
- Drag & drop "Commerce" from main toolbar;
- Choose shopping cart composition;
- Select "Payment Gateways" in right toolbar;
- Enable required payment gateways and click "Apply";
- Drag and drop "Commerce" from main toolbar;
- Choose store composition;
- Select "Edit products" in right toolbar;
- Edit your products and click "Apply".
- Select store and select "Filter" in right toolbar.
- Select from dropdown list "Default product sorting" for your products.
- Select products element and select "Listing" in right toolbar;
- Deselect "Show sorting dropdown".
- Drag & drop "Commerce" from main toolbar;
- Select payment gateway (e.g. Stripe);
- Fill required fields (your credentials for payment system, item name, shipping, etc.) in right toolbar.

- Drag & drop "Commerce" from main toolbar;
- Choose "Store" composition;
- Select "Edit products" in right toolbar;
- Edit your products and click "Apply";
- Select "Store" and select "Contact Form";
- Select and fill "Fields" that inquiry form will have;
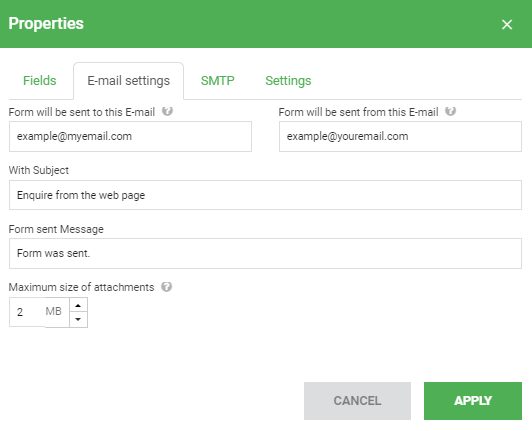
- Select "E-mail settings" and fill required fields (email that form will be sent to, email that form will be sent from).
- Select "Store" and "Settings";
- Select "Use stock info to control sales";
Note. Make sure all items in store have SKU assigned.
- Adding Bank Transfer with store module:
- Drag & drop "Commerce" from main toolbar;
- Choose shopping cart composition;
- Select "Payment Gateways" in right toolbar;
- Click Bank Transfer to add to payment gateways.
- Customising Bank Transfer with store module:
- Write information to display when order is placed;
- Click "Apply";
- Select "Contact Form" in right toolbar;
- Select "E-mail settings" and write "Form will be sent to this E-mail" and "Form will be sent from this E-mail".
Write email subject, form sent message and maximum size of attachments.
- Drag & drop "Commerce" from main toolbar;
- Choose Commerce composition;
- Select "Store Cart" and select "Shipping Methods" in right toolbar;
- Select "Add item";
- Write "Item Name";
- Select "Destination Zone" from dropdown list;
- Select type "By subtotal" or "By weight";
- Select "Add Range";
- Write range value and add price;
- Select to add additional range;
- Write range value and set price to 0;
- Write "Estimated Delivery Times (days).
- Select your "Store" element and click "Check orders" in right toolbar;
- Select "Filter" dropdown menu to see particular type of order;
- See how to change order status.
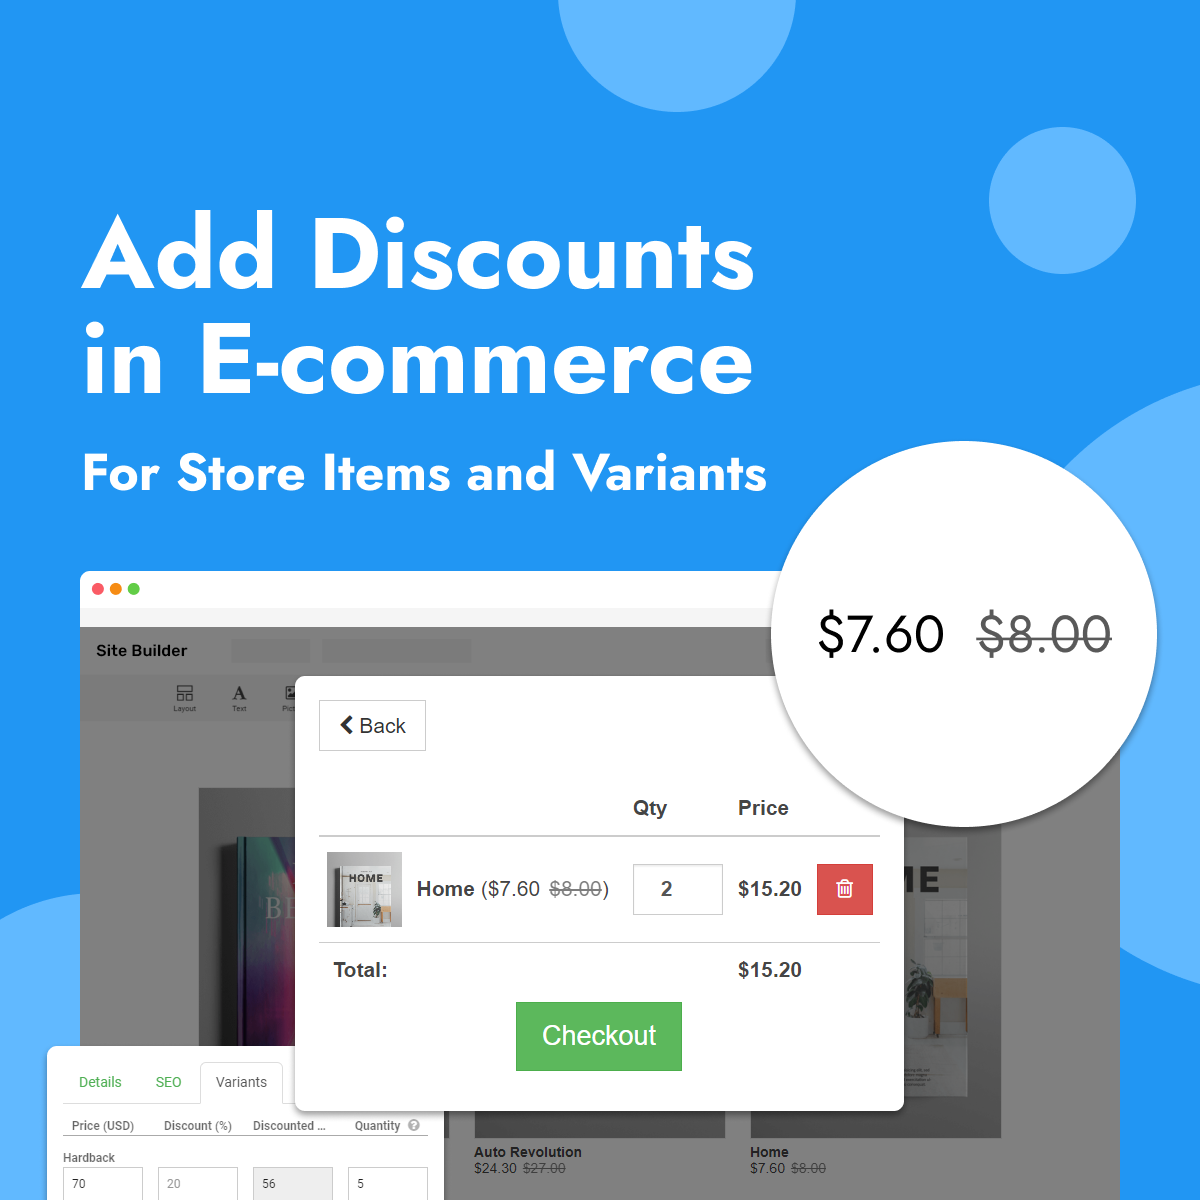
- Select store and in right toolbar click "Edit products";
- In "Discount (%)" field write the percentage of discount;
- "Discounted Price" field appears and shows current product price.
- If you have variants and want to add different discounts for variants:
- Select store and in right toolbar click "Edit products";
- Select variants at the top of window;
- Add discounts to every different variant.
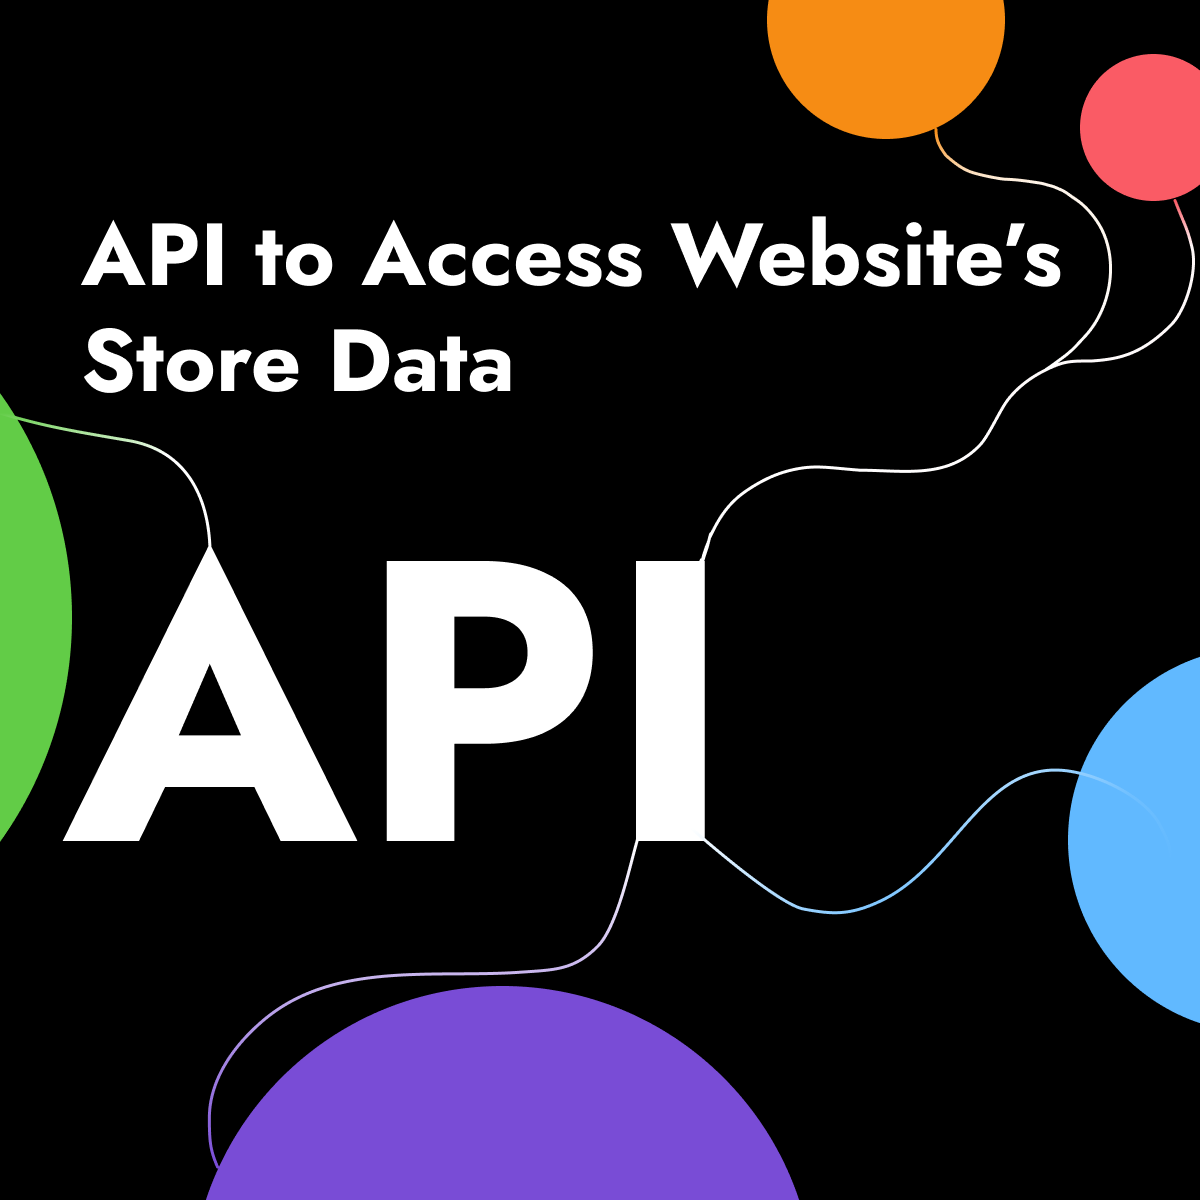
- Select store and in right toolbar click "Invoices";
- Select "API Keys" at top of the window;
- Click "Add item" to create a new API key;
- Write "Name" for your key and select "Enable";
- Click "Show API documentation" to see base URL.
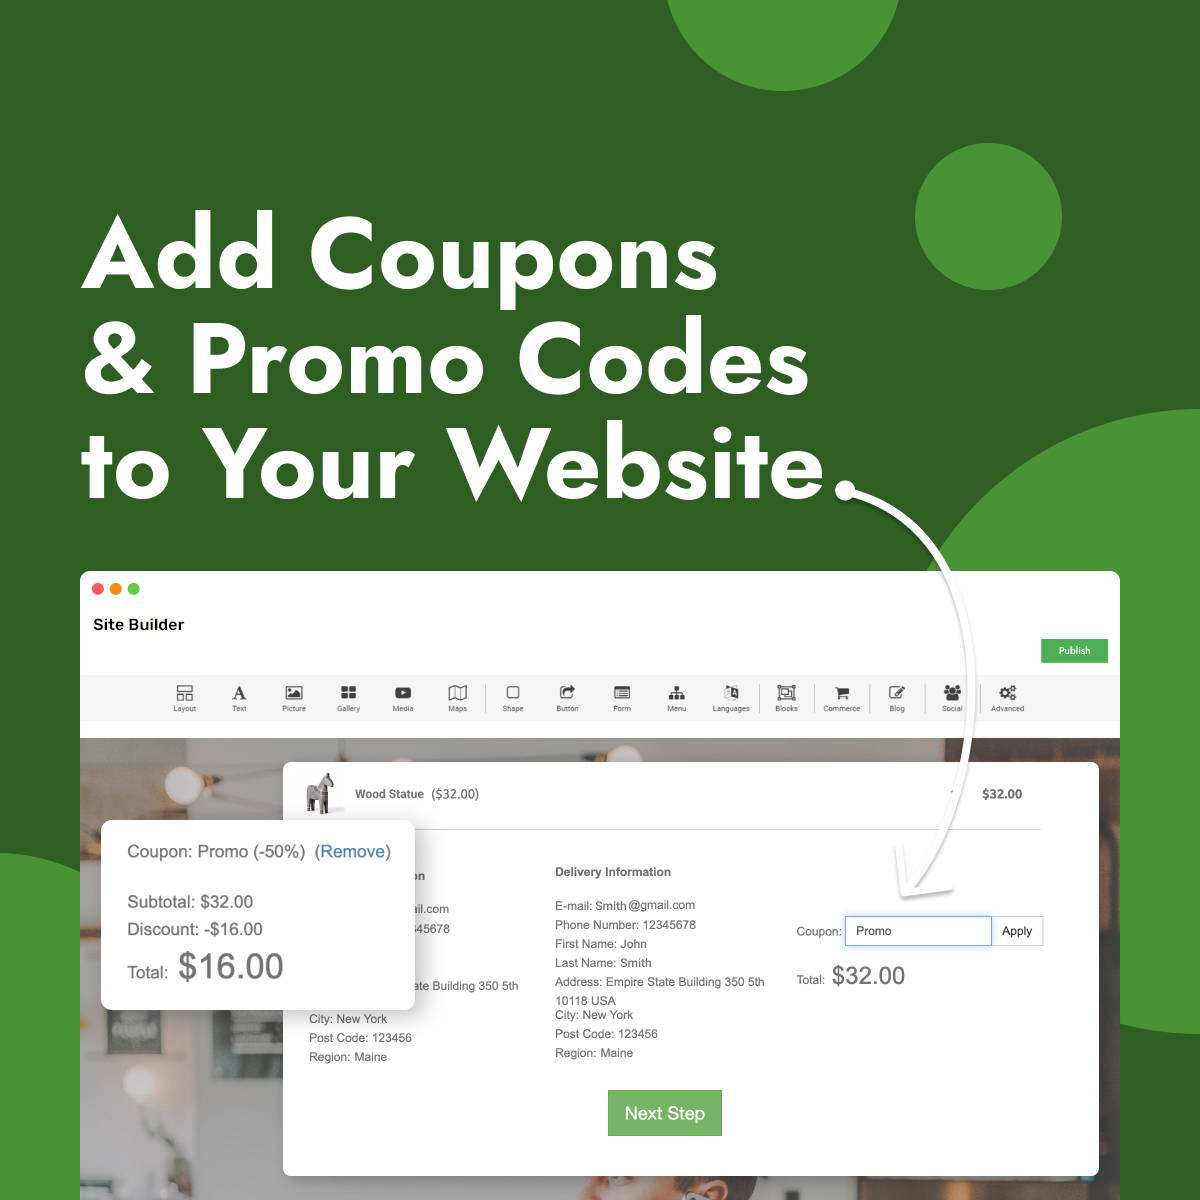
- Adding coupons:
- Select "Store" and click "Coupons" in right toolbar;
- Click "Add item";
- Click "Apply".
- Editing coupons:
- Write "Code" name;
- Select "Type" of coupon from dropdown list;
- Write "Value";
- Write "Date from" and "Date to";
- Choose to enable or disable coupon;
- Choose to "Apply for discounted products";
- Write "Description" about the discount.
Note: This will be seen only in website builder.
- If you need product's price in the store to be displayed in brutto, taxes should be left 0;
- If you need product's price - in netto, add the taxes.
- Go to Page structure on the right side of your website builder;
- Сlick on the "Shopping Cart";
- In right toolbar select "Payment Gateways";
- Select payment gateway and select "Enabled" on top of window;
- Fill in the payment information and click "Apply".
- Adding Cash on Delivery with store module:
- Drag & drop "Commerce" from main toolbar;
- Choose shopping cart composition;
- Select "Payment Gateways" in right toolbar;
- Select Cash on Delivery and click "Enabled" at top of window to add to payment gateways;
- Write Cash on Delivery message that you want your clients to see;
- Click "Apply" to save the progress.
- Customising Cash on Delivery with store module:
- Send order confirmation:
Select store cart and in right toolbar select "Contact Form"
Select e-mail settings and write "Form will be sent to this E-mail" and Form will be sent from this E-mail".
- Send order confirmation:
- Adding PayPal as single-order button:
- Drag & drop "Commerce" from main toolbar;
- Choose PayPal composition;
- Write "Email address to receive payments" in right toolbar.
- Adding PayPal as single-order button:
- Item description:
Write "Item Name" in right toolbar. - Price:
Write product price and currency in right toolbar. - Size:
Set element size or "Allow to adjust size automatically" in right toolbar. - Shipping:
Write "Shipping (Price)" in right toolbar.
- Item description:
- Adding PayPal with store module:
- Drag & drop "Commerce" from main toolbar;
- Choose shopping cart composition;
- Select "Payment Gateways" in right toolbar;
- Select PayPal and click "Enabled" on top of window to add to payment gateways;
- Write PayPal "Email address to receive payments" to connect payment gateway to your PayPal account.
- Customising Paypal with store module:
- Style:
Select Style tab to customise Paypal button.
- Style:
- Adding Paypal test mode:
- Select Paypal "Test mode" in your payment gateways / on right toolbar;
- Read Paypal how to turn on test mode.
- Adding Stripe as single-order button:
- Drag & drop "Commerce" from main toolbar;
- Choose Stripe composition;
- Write "API Key" and "Secret Key" in right toolbar.
- Customising a single-order button:
- Item description:
Write "Item Name" and "Product description" in right toolbar. - Price:
Write product price and currency in right toolbar. - Size:
Set element size or "Allow to adjust size automatically" in right toolbar.
- Item description:
- Adding Stripe with store module:
- Drag & drop "Commerce" from main toolbar;
- Choose shopping cart composition;
- Select "Payment Gateways" in right toolbar;
- Select Stripe and click "Enabled" on top of window to add to payment gateways;
- Write Stripe "Publishable Key" and "Secret Key" and "Webhook Secret" to connect payment gateway to your Stripe account.
Login to your Stripe account, Select "Developers" and see "API keys" and "Webhooks". Click Stripe to get webhook endpoint URL, write it in Stripe. Add event type "checkout.session.completed" for webhook endpoint.
- Customising Stripe:
- Style:
Select Style tab to customise Stripe button.
- Style:
- Adding form:
- Drag & drop "Form" from main toolbar;
- Choose form composition.
- Customising form:
- Add simple fields:
Select form and in right toolbar choose which simple fields to show.
Select which fields are required. - Add options fields:
Select form and in right toolbar choose option fields.
Write question and options as seperate line and select which fields are required. - Add additional fields:
Add additional fields message, attachments or checkboxes in right toolbar.
- Submit button:
Write submit button text.
- URL after submit:
Select URL after submit and write URL or select a page on your website.
Select if required to "Open in a New Window". - Labels:
Select "Label Style" from dropdown menu and "Label Column Width" in right toolbar.
- Email settings:
Write which email / emails form will be sent to and form will be sent from.
Write email subject, form sent message.
Set maximum size of attachements or set to "Submit to URL instead" to have your form data send to URL. - SMTP:
Click "SMTP Enable" to enable SMTP in right toolbar.
Write "SMTP Host" and "SMTP Port" in right toolbar.
Select "SMTP Encryption" in right toolbar.
Write "SMTP Username" and "SMTP Password" in right toolbar. - Google reCAPTCHA (v2):
Write "Site key" and "Secret key" in right toolbar to add google reCAPTCHA.
- Size:
Set form size or "Allow to adjust size automatically" in right toolbar.
- Add simple fields:
When you get this error when sending mail from your website then it usually means one of these:
-
SMTP data is incorrect (double-check username and password, make sure that you specified correct host and port).
-
Firewall on your hosting server blocks outgoing connections from specified SMTP host and / or port. Contact your hosting support and describe this problem to fix the issue.
-
Specified SMTP host (in case if it is a domain — not IP) is not resolved on your hosting server or resolved to a wrong IP address. Contact your hosting support and describe this problem to fix the issue.
For more details on this issue please refer this page.
The problem may occur when you are using field Form will be sent from this Email in form configuration in builder. For example you use address in this field [email protected]. Then mails may not be received on your email account due to the fact that domain mysite.com does not have DNS record of type SPF (for more details please see https://en.wikipedia.org/wiki/Sender_Policy_Framework). Due to this mails can be blocked by mail servers. If you are an owner of domain "mysite.com" you need to add SPF record in DNS configuration of your domain.
When you do not have field "Form will be sent from this Email" filled in then the address [email protected] is used (where "mysite.com" is replaced with your website domain name). In this case the reason of not receiving mails is the same as described above.
If this error is thrown during publication then it means that builder cannot open folder where the website is meant to be published (usually the folder is "public_html" but it can differ depending on hosting control panel).
To fix this error just make sure that you have web root folder in your home directory in file manager. If you are not sure what folder exactly you need to create (or check existence) then contact your hosting provider and provide this FAQ message.
If this error is thrown during publication then it means that builder cannot open folder where the website is meant to be published (usually the folder is "public_html" but it can differ depending on hosting control panel).
You accidentally pressed "Reset" or "Change template" button. Check if you have manual or automatic backup enabled. Hover on Publish icon and you will see "Backup / Restore" item;
You closed the website builder without pressing "Save draft" after creating a website. Always make sure you saved your website before closing the browser tab. Also we advise to make website backups regularly.
To solve this problem please take the following steps:
- Open builder in Chrome or Firefox browser;
- Open developer tools in browser (key F12);
- Switch to "Network" tab;
- Click on "Save" button in builder;
- Click on appeared request line (it should begin with "?sess=");
- Switch to "Response" tab;
- Copy text you see in this tab;
- Create ticket on OpsPi Dashboard support link and tell us about "error loading page" and paste copied text. Our developers will fix this problem;
How to edit your Antispam settings in H-Sphere
How to create an email autoresponder in H-Sphere
How to change your billing information in H-Sphere
How to change your contact information in H-Sphere
How to set up Cron Jobs in H-Sphere
How to change your default page in H-Sphere
How to delete existing domains in H-Sphere
How to create a domain alias in H-Sphere
How to backup and restore your website in H-Sphere
How to use the Easy Apps Collection in H-Sphere
How to create an email alias in H-Sphere
How to change your email password in H-Sphere
How to create custom error pages in H-Sphere
How to create email forwarders in H-Sphere
How to manage FrontPage extensions in H-Sphere
How to change your control panel and FTP passwords in H-Sphere
How to create additional FTP accounts in H-Sphere
How to Change your hosting plan and billing period in H-Sphere
How to login to your H-Sphere control panel
How to create a mailing list in H-Sphere
How to create an MSSQL database in H-Sphere
How to create an MYSQL database in H-Sphere
How to create a new domain in H-Sphere
Managing MySQL databases with PHPMyAdmin in H-Sphere
How to create a POP email account in H-Sphere
How to password protect a directory using WebShell
How to create a subdomain in H-Sphere
How to submit a trouble ticket in H-Sphere
How to create URL redirect in H-Sphere
How to login to webmail from H-Sphere
How to use WebShell in H-Sphere
How to create an Instant Alias Template in H-Sphere
How to create billing period in H-Sphere
How to blacklist an user in H-Sphere
How to setup your corporate site in H-Sphere
How to create plans in H-Sphere
How to track services offered with Custom jobs in H-Sphere
How to delete/restore an account in H-Sphere
How to create your DNS zone in H-Sphere
How to login to H-Sphere as a reseller
How to change the look and feel of H-Sphere
How to enable email notifications H-Sphere
How to setup payment settings in H-Sphere
How to enable reports in H-Sphere
How to limit end-user resources in H-Sphere
How to add server aliases in H-Sphere
How to configure a Client Support Center in H-Sphere
How to suspend a user account in H-Sphere
How to find a user's account in H-Sphere
How to log in to Plesk as an Administrator
Getting Started with Parallels Plesk Panel 10
How to create and manage Resellers in Plesk
How to create and manage Reseller Plans in Plesk
How to manage IP addresses in Plesk
How to upload additional Applications in Plesk
How to configure and manage Database Servers in Plesk
How to send Mass E-mail Messages in Plesk
How to manage your system's Scheduled Tasks in Plesk
How to use the Event Manager in Plesk
Viewing and Configuring Server Health Reports in Plesk
How to change the server's hostname and other settings in Plesk
How to adjust the System Time in Plesk
How to configure the DNS Template Settings in Plesk
How to configure the DNS Template Settings in Plesk
How to configure Mail Server and Virus Protection Settings in Plesk
How to set up E-mail Notifications in Plesk
How to change the Action Log settings in Plesk
How to log in to Plesk
Becoming familiar with the Plesk interface
How to get help with Plesk
How to change your Password and Contact Information in Plesk
How to change a subscription's login info in Plesk
How to create and manage User Roles in Plesk
How to create and manage User Accounts in Plesk -
How to create and manage E-mail Accounts in Plesk
How to create E-mail Aliases in Plesk
How to specify a Catchall E-mail Account in Plesk
How to set up E-mail Forwarding in Plesk
How to enable Auto-Reply for an E-mail Address in Plesk
How to use the Spam Filter and Antivirus Protection in Plesk
How to access Webmail in Plesk
How to create Mailing Lists in Plesk
How to add and manage Domains & Subdomains in Plesk
How to create Domain Aliases in Plesk
How to find and install Applications in Plesk
How to use the File Manager in Plesk
How to view website statistics in Plesk
How to change your FTP account credentials in Plesk
How to create additional FTP accounts in Plesk
How to set up Anonymous FTP access in Plesk
How to manage your domains' DNS Zones in Plesk
How to install SSL Certificates in Plesk
How to use the Backup Manager in Plesk
How to password protect a directory in Plesk
How to set up Scheduled Tasks (Cron Jobs) in Plesk
How to create Databases in Plesk
How to manage databases with the Webadmin in Plesk
How to view and manage a website's logs in Plesk
How to set up Web Users in Plesk
How to create Custom Buttons in Plesk
How to log in to Plesk as a Reseller
Getting Started with Parallels Plesk Panel 10
How to change your Password and Contact Information in Plesk
How to create and manage Customers in Plesk
How to create and manage Subscriptions in Plesk
How to create and manage Service Plans in Plesk
How to create and manage Add-ons in Plesk
How to activate or suspend a Customer or Subscription in Plesk
How to remove a Customer or Subscription in Plesk
How to change a customer's Login Info in Plesk
How to change a subscription's IP address and System Login Info in Plesk
How to access a subscriber's Control Panel in Plesk
How to change a subscription's Plan and Add-ons in Plesk
How to customize a subscription in Plesk
How to synchronize a subscription with its Service Plan in Plesk
How to change a subscription's Expiration Date in Plesk
How to move a subscription from one customer to another in Plesk
How to view a report of app installations in Plesk
Viewing Resource Usage Statistics and Reports in Plesk
How to manage the Virtual Host Template in Plesk
How to use the Backup Manager in Plesk
How to customize your Panel Branding in Plesk
How to create Custom Buttons in Plesk
How to add a domain in WebsitePanel
How to add Scheduled Tasks in WebsitePanel
How to use the Application Installer in WebsitePanel
How to backup and restore your user account in WebsitePanel
How to create users for a database in WebsitePanel
How to create a mail account in WebsitePanel
How to create a MySQL database in WebsitePanel
How to create a peer account in WebsitePanel
How to create a MS SQL server database in WebsitePanel
How to create Web Sites in WebsitePanel
How to edit your account details in WebsitePanel
How to setup email forwarding in WebsitePanel
How to create custom error pages in WebsitePanel
How to use File Manager in WebsitePanel
How to install FrontPage extensions in WebsitePanel
How to create a FTP account in WebsitePanel
How to login to WebsitePanel
How to create an ODBC DSN (Data Source Name) in WebsitePanel
How to view your quotas in WebsitePanel
How to view Reports in WebsitePanel
How to add a shared SSL folder in WebsitePanel
How to create a sub-domain in WebsitePanel
How to enable offline payments in WebsitePanel
How to create hosting account addons in WebsitePanel
How to backup your hosting space in WebsitePanel
How to enable credit card payments in WebsitePanel
How to create a customer account in WebsitePanel
How to create a peer account in WebsitePanel
How to create hosting plans in WebsitePanel
How to enable Directi domain registration in WebsitePanel
How to update your contact information in WebsitePanel
How to update your profile in WebsitePanel
How to edit email notifications in WebsitePanel
How to enable enom domain registration in WebsitePanel
How to login to WebsitePanel as a reseller
How to change your reseller password in WebsitePanel
How to enable PayPal payments in WebsitePanel
How to set your Terms and Conditions in WebsitePanel
How to add a domain in WebsitePanel
All Comodo SSL Digital Certificates are managed through Client Area - https://billing.jodohost.com/. SSL Can be purchased from ../ssl-digital-certificates.asp or from Client Area
All Thawte SSL Digital Certificates are managed through Customer CP - http://domainsgofast.com/login.php. SSL Can be purchased from http://domainsgofast.com/digital-ssl-certificate/index.php or Customer CP.
This is the most efficient way to contact us. Emergency tickets are generally answered within 5-15 minutes. Our support staff continuously looks for new tickets and answer them 24x7x365 days basis. When you open a new ticket, you will get a ticket confirmation number. If later you contact us by Live Chat or by phone, please keep this number handy.
Please see the following, to choose to appropriate helpdesk link for support:
Windows or Linux Hosting Customers, with
Date of Signup: Prior to June 23rd, 2007, and
Control Panel: https://cp.jodoshared.com
Please Use: https://billing.jodohost.com/ for supports
Reseller Hosting Customers, with
Date of Signup: Prior to June 23rd, 2007, and
Control Panel: Click here for Cluster 1
https://billing.jodohost.com/ for support
Windows, Linux or Reseller Hosting Customers, with
Date of Signup: After June 23rd, 2007, and
Control Panel: Click here for Cluster 2
https://billing.jodohost.com/ for support
Windows VPS Hosting Customers, please login directly to your
Support Center - https://billing.jodohost.com/ (Use your Hsphere login details to open a ticket in support)
Our Support forums allow customers to interact with each other and to seek help on general issues. Our support forums are available at http://support.jodohost.com. Please use our ticket system to directly contact us or to seek help on more specific issues.
Although it is recommended that you use our ticket system, customers may also contact us for support on the following email addresses. These are directly fed into our ticket system and you'd be emailed back with a ticket confirmation email:
Windows or Linux Hosting, with
Date of Signup: Prior to June 23rd, 2007, and
Control Panel: https://cp.jodoshared.com/
please email [email protected] for support
Reseller Hosting Customers, with
Date of Signup: Prior to June 23rd, 2007, and
Control Panel: https://cp.myhsphere.biz
please email [email protected] for support
Windows, Linux or Reseller Hosting Customers, with
Date of Signup: After June 23rd, 2007, and
Control Panel: https://cp.gohsphere.com
please email [email protected] for support
Windows VPS Customers, please email [email protected] for support
(Please always mention your user name when contacting us by e-mail)
To chat with a customer service representative, please click the "Live Chat" link on our website. You'll be able to talk to a support representative 24x7.
You can contact us on following numbers on 24 hrs basis:
India: 1800 102 6004 (Available 24x7)
USA: (941) 876-6175 (Available 24x7)